
How to Upload Blog in WordPress: A Complete Step-by-Step Guide
If you’re wondering how to upload blog in WordPress, you’ve landed in the right place. Whether you’re launching your very first website or you’re a seasoned site owner who wants a quick refresher, publishing a blog post in WordPress is one of the most fundamental skills every content creator needs. WordPress powers a huge share of websites on the internet today, and its popularity comes largely from how simple it makes the process of writing, formatting, and publishing content. In this guide, we’ll walk through every step of uploading a blog post in WordPress, from logging into your dashboard to hitting that final “Publish” button, along with tips to make your content more effective, SEO-friendly, and reader-ready.
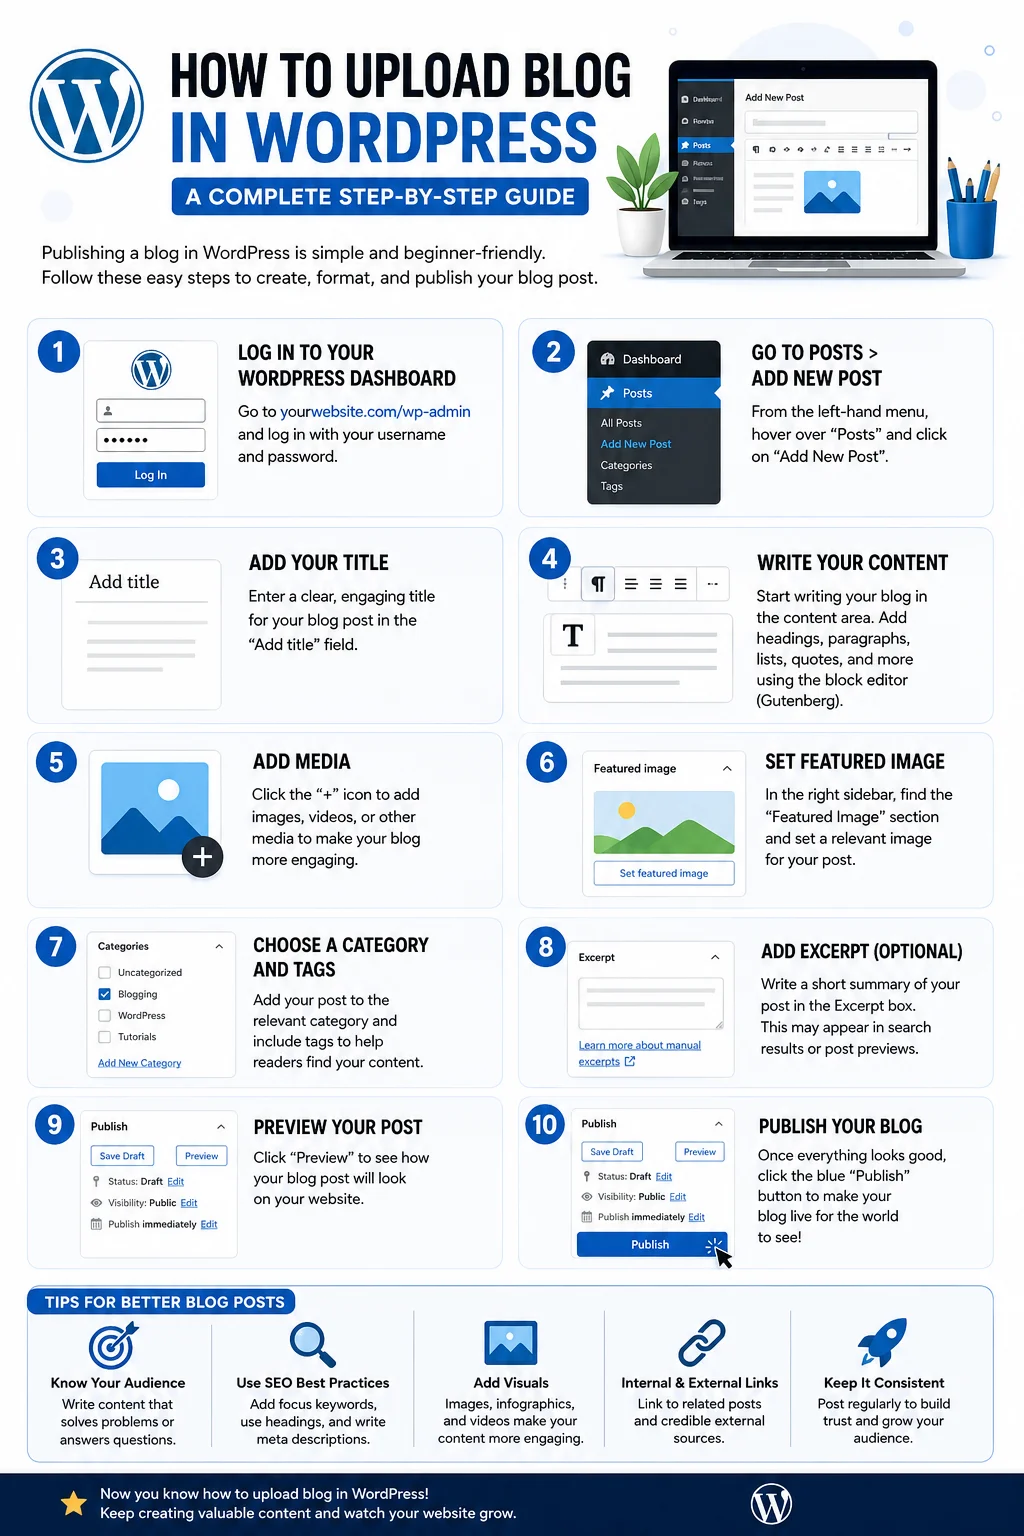
By the end of this article, you’ll have a clear, repeatable process for uploading blogs in WordPress, whether you’re using the classic editor, the block editor (Gutenberg), or even doing it from a mobile device.
Why WordPress Is the Go-To Platform for Blogging
Before diving into the how-to, it helps to understand why so many bloggers, businesses, and content creators choose WordPress in the first place. WordPress is a free, open-source content management system (CMS) that gives users incredible flexibility. It supports thousands of themes and plugins, has a massive global community for support, and is highly customizable for almost any type of website, whether that’s a personal blog, an online store, a portfolio, or a corporate site.
One of the biggest advantages of WordPress is its intuitive dashboard. Even people with zero coding experience can learn how to upload blog in WordPress within minutes. The platform is designed so that writing and publishing content feels as natural as typing in a word processor, while still giving you access to powerful formatting, media, and SEO tools behind the scenes.
What You Need Before You Start
Before you upload your first blog post, make sure you have the following ready:
- A WordPress website – either self-hosted (WordPress.org) or hosted on WordPress.com.
- Admin or Editor access – you need the right user role to create and publish posts.
- Your content – the blog draft, including title, body text, and any images you plan to use.
- Images or media files – optimized for web use (compressed, correctly sized, and properly named for SEO).
- A basic understanding of your site’s categories and tags – this helps keep your blog organized.
Once you have these ready, you’re all set to begin the upload process.
Step 1: Log Into Your WordPress Dashboard
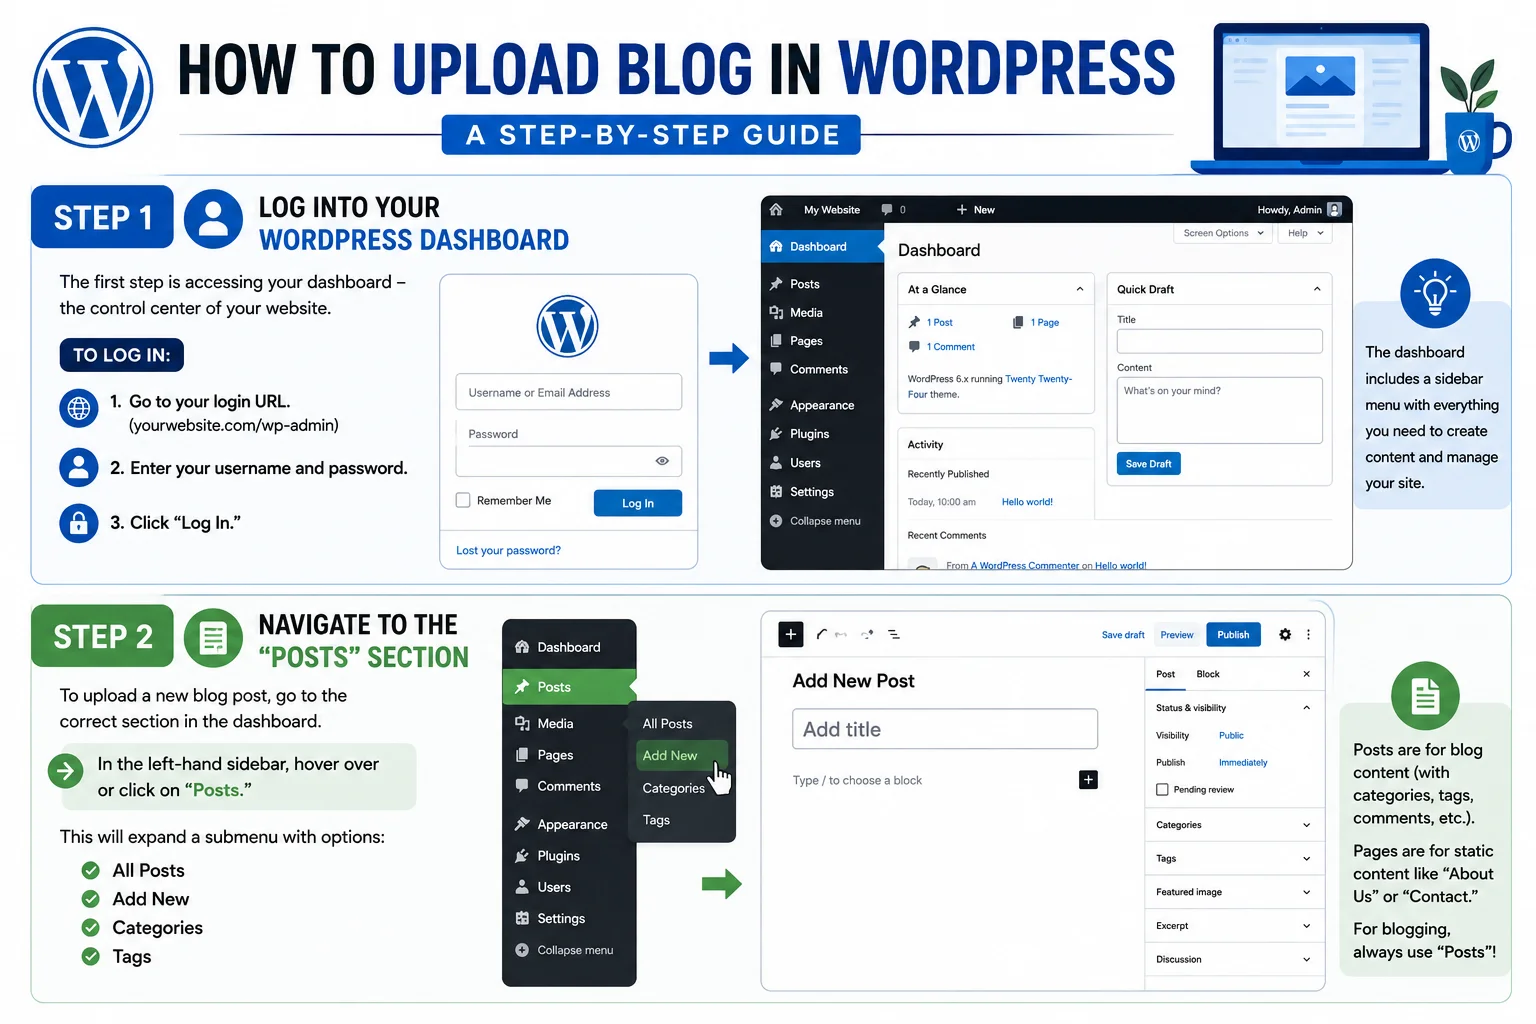
The first step in learning how to upload blog in WordPress is accessing your dashboard. This is the control center of your website, where all content creation and site management happens.
To log in:
- Open your browser and go to your website’s login URL. This is typically your domain followed by
/wp-admin(for example,yourwebsite.com/wp-admin). - Enter your username and password.
- Click “Log In.”
Once logged in, you’ll see the WordPress dashboard, which includes a sidebar menu with options like Posts, Pages, Media, Comments, Appearance, Plugins, Users, and Settings. This sidebar is your main navigation tool for everything you’ll do in WordPress, including uploading blog content.
Step 2: Navigate to the “Posts” Section
To upload a new blog post, you need to go to the correct section of the dashboard. In the left-hand sidebar, hover over or click on “Posts.” This will expand a submenu with options including:
- All Posts
- Add New
- Categories
- Tags
Click on “Add New” to open a blank post editor where you’ll begin creating your blog content.
It’s worth noting the difference between “Posts” and “Pages” in WordPress. Posts are used for blog content that’s typically organized in reverse chronological order and often includes categories, tags, and comments. Pages, on the other hand, are used for static content like your “About Us,” “Contact,” or “Services” pages. If your goal is blogging, always use the “Posts” section rather than “Pages.”
Step 3: Create and Format Your Blog Post
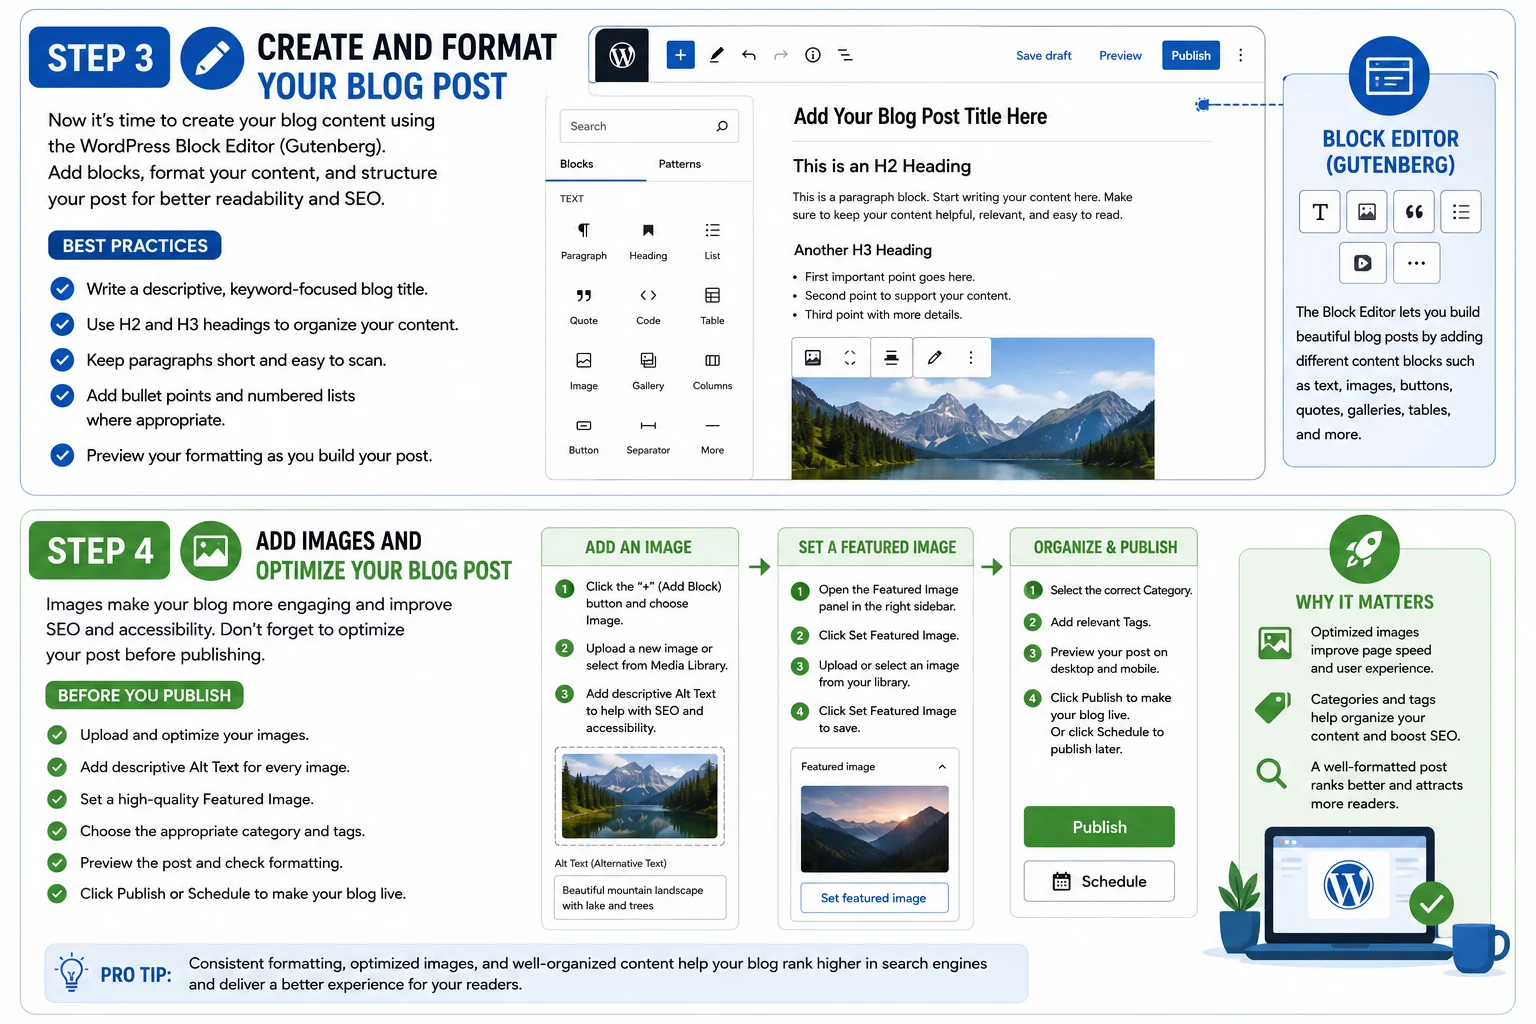
Once you’ve opened the post editor, it’s time to create your blog content. WordPress uses the Block Editor (Gutenberg), which makes it easy to build visually appealing blog posts without any coding knowledge. Each section of your content—such as paragraphs, headings, images, lists, or videos—is added as a separate block, giving you complete control over your post’s layout.
Start by entering a clear, keyword-rich title that accurately describes your blog post. Then, add your content using well-structured headings and short paragraphs to improve readability. You can click the “+” (Add Block) button to insert text, images, buttons, quotes, tables, galleries, or other content elements as needed.
Taking the time to format your content properly not only enhances the user experience but also improves your blog’s SEO performance. Well-organized posts are easier for visitors to read and help search engines better understand your content.
Best Practices
- Write a descriptive, keyword-focused blog title.
- Use H2 and H3 headings to organize your content.
- Keep paragraphs short and easy to scan.
- Add bullet points and numbered lists where appropriate.
- Preview your formatting as you build your post.
Step 4: Add Images and Optimize Your Blog Post
Images play an important role in making your blog more engaging while also improving SEO and accessibility. To insert an image, click the “+” (Add Block) button and choose the Image block. You can upload a new image from your computer or select one from the WordPress Media Library.
For every image you upload, add descriptive Alt Text that accurately explains the image. Alt text improves accessibility for screen readers and helps search engines understand your visual content. Before uploading, compress your images to reduce file size and improve page loading speed.
Next, set a Featured Image by selecting the Featured Image panel in the right sidebar. This image represents your blog post across your website, blog archives, and social media platforms, making it an essential part of your content’s visual appeal.
Before publishing, review your post by assigning the appropriate category and tags, checking your formatting, and previewing the page on desktop and mobile devices. Once you’re satisfied, click Publish to make your blog live, or schedule it for a future date if you have a content calendar.
Before You Publish
- Upload and optimize your images.
- Add descriptive Alt Text for every image.
- Set a high-quality Featured Image.
- Choose the appropriate category and tags.
- Preview the post and check formatting.
- Click Publish or Schedule to make your blog live.
These sections are written in a natural, SEO-friendly style and match the tone of your existing article, making them suitable for both your website content and your infographic.
Step 5: Insert Images and Media
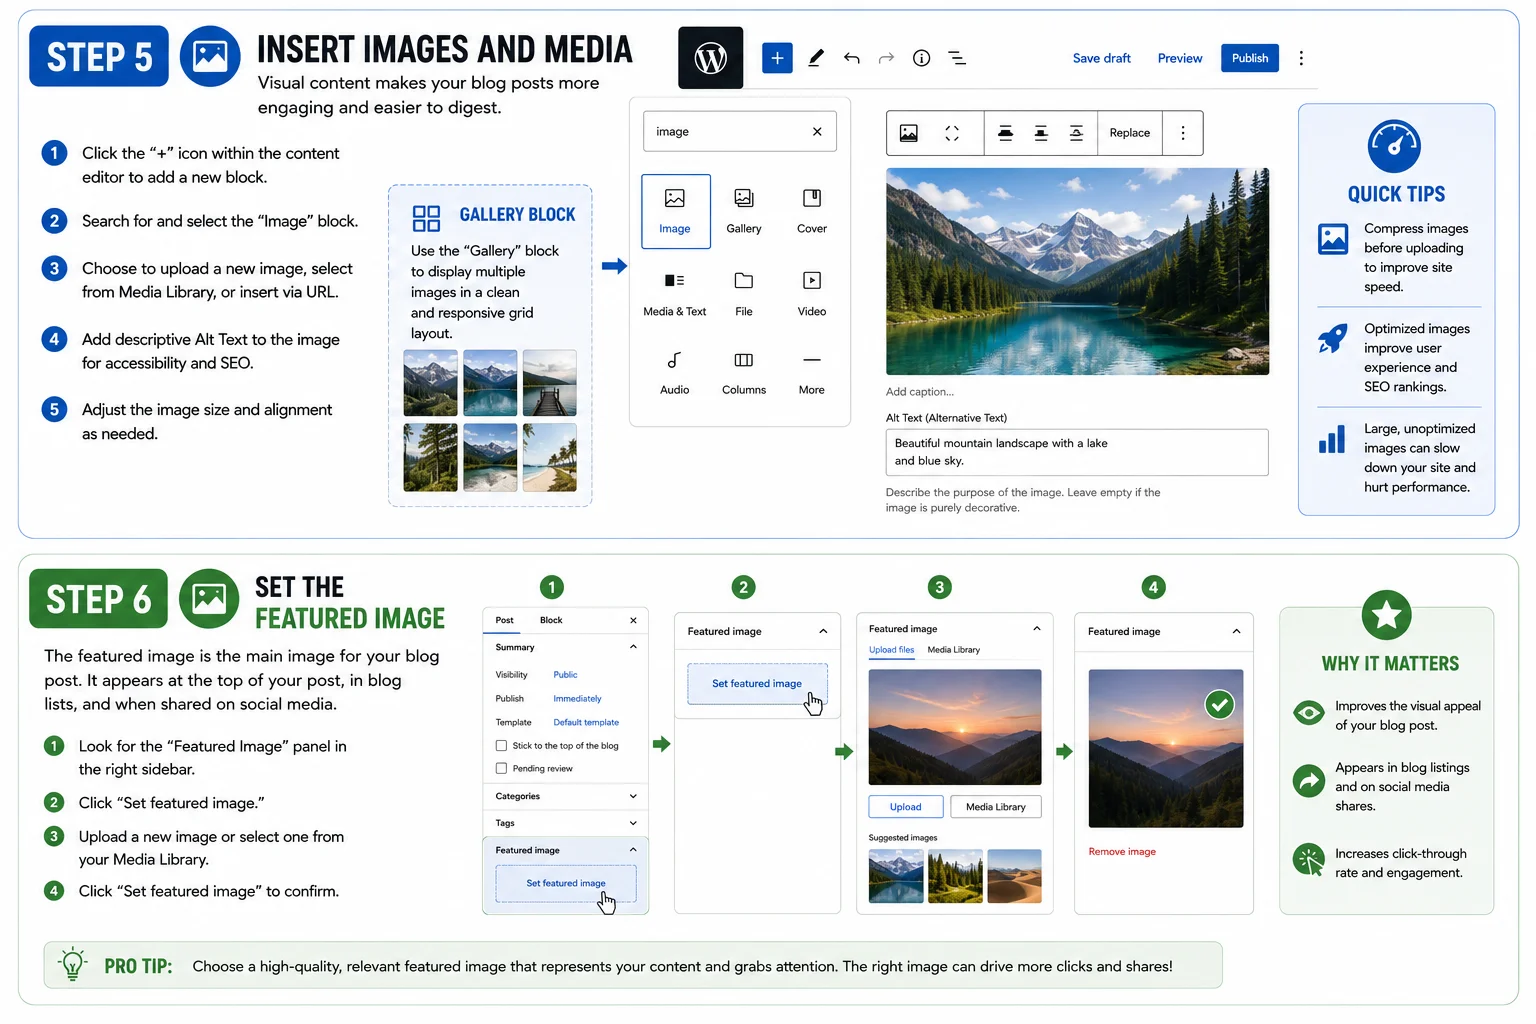
Visual content makes blog posts more engaging and easier to digest. To add an image in WordPress:
- Click the “+” icon within the content editor to add a new block.
- Search for and select the “Image” block.
- Choose to either upload a new image from your device, select one from your existing media library, or insert an image via URL.
- Once uploaded, add descriptive alt text to the image. This is important for both accessibility and SEO, as alt text helps search engines understand what the image depicts.
- Adjust the image size and alignment as needed.
If you have a large number of images, you can also use the “Gallery” block to display them in a grid format.
Remember to compress images before uploading to keep your site loading quickly. Large, unoptimized images are one of the most common causes of slow-loading websites, which can hurt both user experience and search rankings.
Step 6: Set the Featured Image
The featured image is the main image associated with your blog post. It typically appears at the top of the post, in blog listing pages, and when the post is shared on social media.
To set a featured image:
- Look for the “Featured Image” panel in the right-hand sidebar of the post editor.
- Click “Set featured image.”
- Upload a new image or select one from your media library.
- Click “Set featured image” to confirm.
Choosing a high-quality, relevant featured image helps improve the visual appeal of your blog and increases the likelihood of clicks when shared on social platforms.
Step 7: Assign Categories and Tags
Organizing your content properly makes it easier for visitors to find related posts and helps search engines understand your site structure.
Categories are broad groupings for your content (for example, “WordPress Tutorials,” “SEO Tips,” or “Web Design”). Each post should typically be assigned to at least one category.
Tags are more specific keywords related to your post’s content (for example, “blogging,” “content upload,” “WordPress editor”). Tags help with internal search and content discovery.
To assign these:
- Find the “Categories” panel in the sidebar and check the relevant category, or create a new one if needed.
- Find the “Tags” panel below it and type in relevant tags, pressing Enter after each one.
Avoid creating too many categories or tags, as this can make your site feel cluttered and disorganized. Stick to a clear, logical structure.
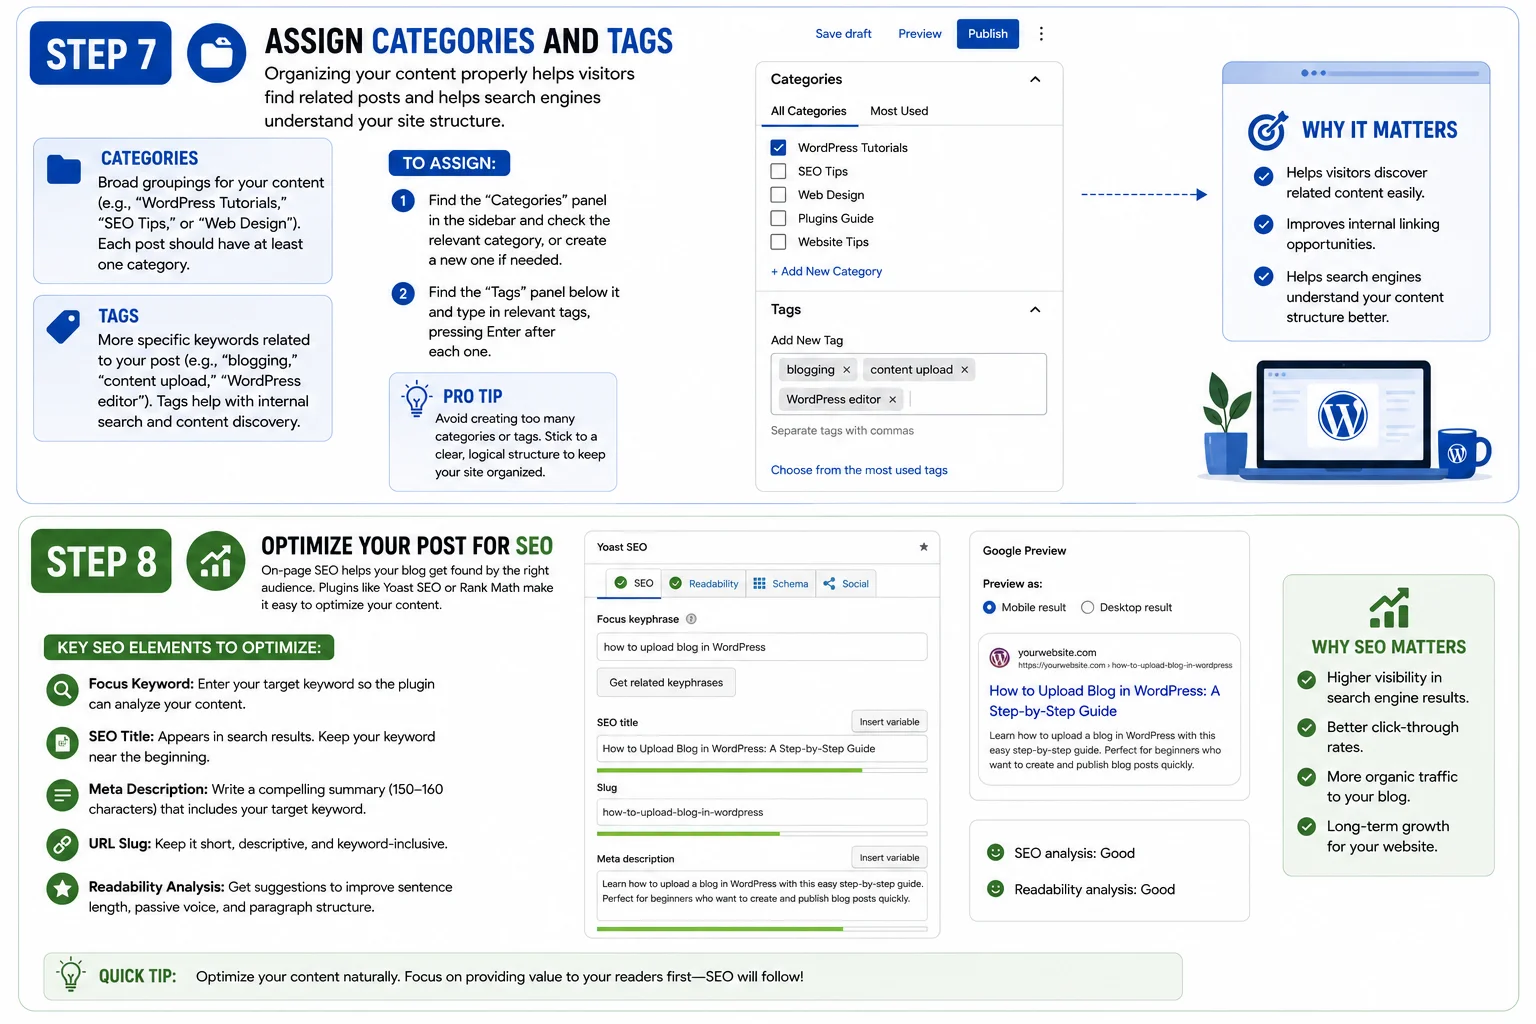
Step 8: Optimize Your Post for SEO
If you want your blog to actually get found by readers, on-page SEO is critical. Most WordPress sites use plugins like Yoast SEO or Rank Math to simplify this process. These plugins add a panel below your content editor (or in the sidebar) where you can control several important SEO elements.
Key SEO Elements to Optimize:
- Focus Keyword: Enter your target keyword, such as “how to upload blog in WordPress,” so the plugin can analyze your content against it.
- SEO Title: This may differ slightly from your blog title and appears in search engine results. Keep your keyword near the beginning.
- Meta Description: Write a concise, compelling summary (roughly 150-160 characters) that includes your target keyword. This appears under your title in search results and significantly impacts click-through rates.
- URL Slug: Edit your post’s URL to be short, descriptive, and keyword-inclusive. For example:
yourwebsite.com/how-to-upload-blog-in-wordpress. - Readability Analysis: Many SEO plugins also assess sentence length, passive voice usage, and paragraph structure, offering suggestions to improve overall readability.
Taking a few extra minutes to fine-tune these elements can make a significant difference in how well your post performs in search results over time.
Step 9: Preview Your Post
Before publishing, always preview your blog post to check how it will appear to visitors. WordPress provides a “Preview” button, usually located near the top-right of the editor screen.
Use this step to check for:
- Formatting issues (misaligned images, broken layouts)
- Typos or grammatical errors
- Broken links
- Mobile responsiveness (many themes offer a mobile preview option)
- Overall flow and readability
Catching these issues before publishing helps maintain a professional appearance and avoids the need for embarrassing edits after the post goes live.
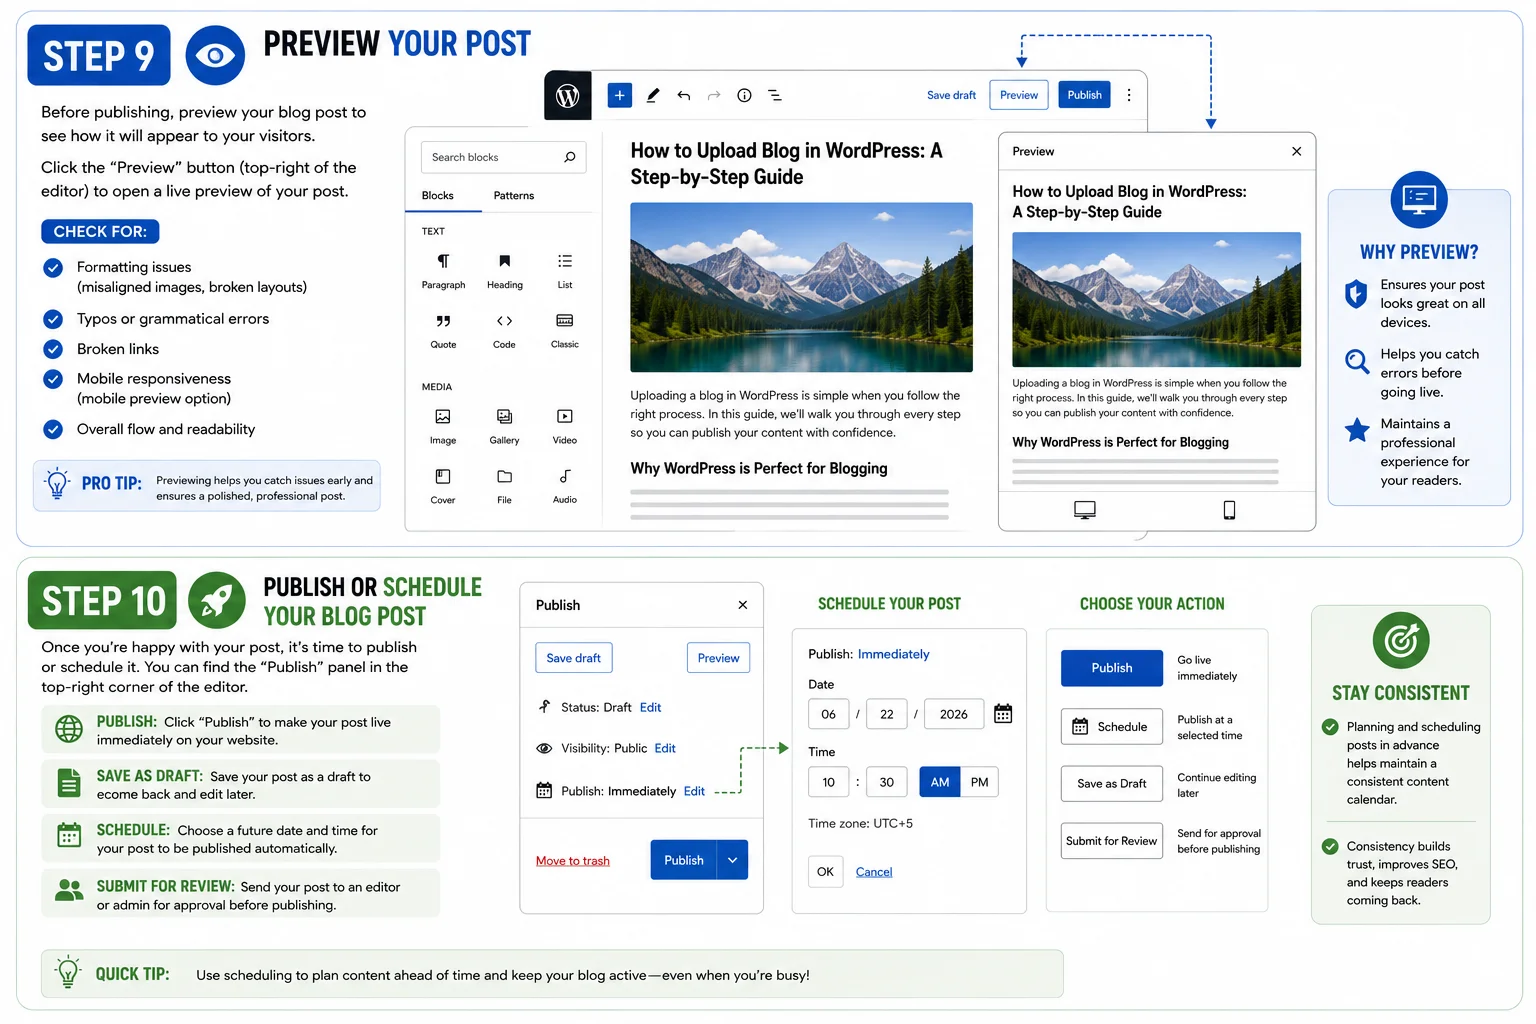
Step 10: Publish or Schedule Your Blog Post
Once you’re satisfied with your content, formatting, images, and SEO settings, it’s time for the final step in how to upload blog in WordPress: publishing.
In the top-right corner of the editor, you’ll see a “Publish” button (or “Update” if you’re editing an existing post). Clicking this button makes your post live on your website immediately.
If you’d rather not publish right away, WordPress also allows you to:
- Save as Draft: Keep working on the post later without making it public.
- Schedule: Set a specific future date and time for the post to go live automatically. This is useful for maintaining a consistent content calendar.
- Submit for Review: If you’re working with a team, this option sends the post to an editor or admin for approval before publishing.
To schedule a post, click on the “Publish” panel settings, change “Immediately” to your desired date and time, then click “Schedule” instead of “Publish.”
Common Mistakes to Avoid When Uploading a Blog in WordPress
Even with a straightforward process, beginners often run into a few common issues. Here are some mistakes to watch out for:
- Forgetting to add alt text to images, which hurts both accessibility and SEO.
- Using overly long paragraphs that make content hard to read on mobile devices.
- Skipping the meta description, leaving search engines to generate one automatically, which is often less effective than a well-written one.
- Not proofreading before publishing, leading to typos or broken sentences going live.
- Ignoring internal linking, which is a missed opportunity to keep readers engaged with more of your content.
- Uploading oversized images, which can slow down page load speed significantly.
- Not assigning categories or tags, making the post harder to discover through site navigation.
Avoiding these pitfalls will help ensure your blog posts are polished, professional, and optimized for both readers and search engines.
Uploading a Blog Post via the Classic Editor
While the block editor is now the default in WordPress, some websites still use the Classic Editor plugin, especially if they were built years ago or rely on specific themes and plugins that haven’t been updated for block compatibility.
If you’re using the Classic Editor, the process is slightly different but still simple:
- Go to Posts > Add New, just like before.
- You’ll see a single large text box with a toolbar similar to a word processor (bold, italics, alignment, bullet points, etc.).
- Type or paste your content directly into this box.
- Use the “Add Media” button above the text box to insert images.
- Set your featured image, categories, and tags in the sidebar panels, just as in the block editor.
- Scroll down to fill in SEO plugin fields if installed.
- Click “Publish” when ready.
Whether you’re using the block editor or the classic editor, the core steps of how to upload blog in WordPress remain largely the same: write your content, add media, optimize for SEO, and publish.
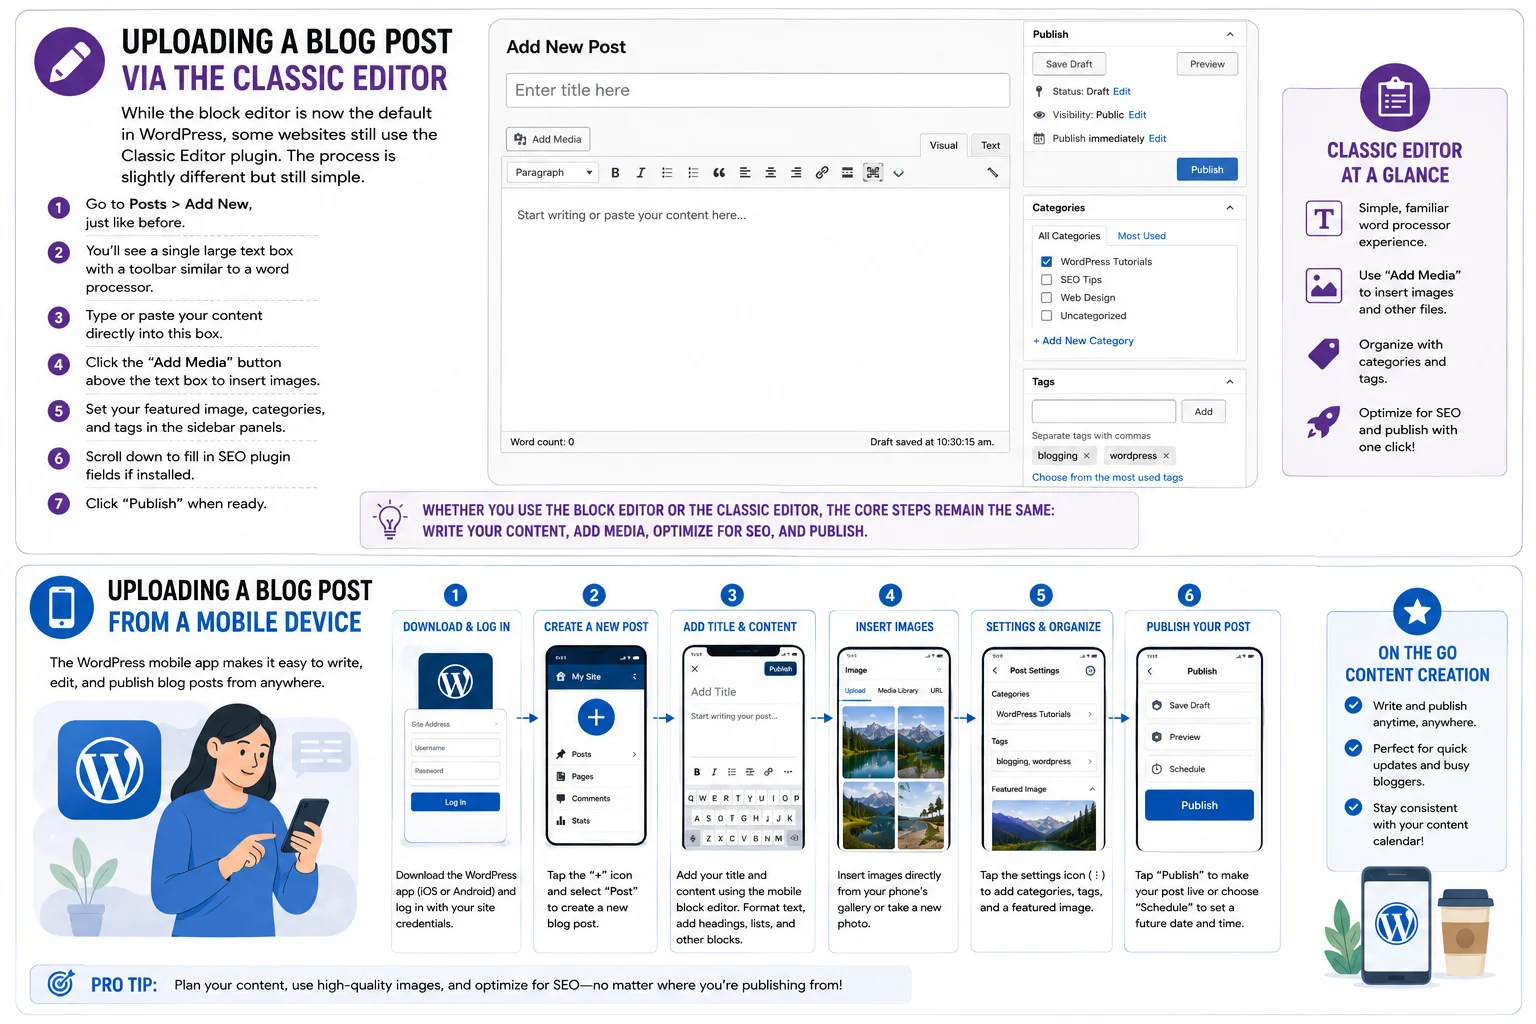
Uploading a Blog Post from a Mobile Device
WordPress also offers a mobile app (available for both iOS and Android) that allows you to write and publish blog posts on the go. Here’s a quick overview of the process:
- Download the WordPress app and log in with your site credentials.
- Tap the “+” icon to create a new post.
- Add your title and content using the mobile block editor.
- Insert images directly from your phone’s gallery or camera.
- Adjust categories, tags, and featured image through the settings menu (represented by an icon in the top corner).
- Tap “Publish” when you’re ready to go live.
This is a convenient option for bloggers who want to publish quick updates or make edits without needing access to a computer.
Frequently Asked Questions: How to Upload Blog in WordPress
1. Is it hard to learn how to upload blog in WordPress?
No. Learning how to upload blog in WordPress is one of the easiest skills for beginners to pick up, since the dashboard is designed to be user-friendly even for first-time users.
2. Do I need coding skills to upload blog in WordPress?
Not at all. The whole point of WordPress is that you don’t need to code. Once you know how to upload blog in WordPress using the built-in editor, you can publish content without touching a single line of HTML or CSS.
3. Can I upload blog in WordPress from my phone?
Yes. The WordPress mobile app lets you upload blog in WordPress from anywhere, so you’re not tied to a desktop computer to publish new posts.
4. How long does it take to upload blog in WordPress?
Once your content is written, the actual process to upload blog in WordPress — adding your title, pasting your text, inserting images, and hitting publish — usually takes less than 10 minutes.
5. What’s the most common mistake people make when they upload blog in WordPress?
The most common mistake is skipping SEO optimization. Many beginners upload blog in WordPress without setting a meta description, focus keyword, or alt text, which limits how well the post performs in search results.
6. Can I schedule a post instead of publishing it immediately?
Yes. WordPress lets you upload blog in WordPress and schedule it for a future date, which is great for maintaining a consistent content calendar.
7. Do I need a plugin to upload blog in WordPress?
No plugin is required to upload blog in WordPress — the core software already includes everything you need. However, SEO plugins like Yoast or Rank Math make the process more effective.
8. Is it possible to edit a post after I upload blog in WordPress?
Absolutely. You can go back and edit any post after you upload blog in WordPress, whether that’s fixing a typo, updating information, or adding new images.
9. What file types can I use when I upload blog in WordPress?
When you upload blog in WordPress, you can typically include JPEG, PNG, GIF, and WebP images, along with PDF documents and standard video embeds.
10. Why should I learn how to upload blog in WordPress properly instead of just winging it?
Taking the time to learn how to upload blog in WordPress the right way — with proper formatting, SEO, and media optimization — leads to better search rankings, more engaged readers, and a more professional-looking website overall.
Tips for Writing Blog Content That Performs Well After Upload
Uploading your blog is only part of the equation. To truly succeed, your content needs to be valuable, well-structured, and optimized for both readers and search engines. Here are a few additional tips to keep in mind:
- Answer a specific question or solve a problem. Readers come to blogs looking for solutions, so make sure your content delivers real value.
- Use your target keyword naturally throughout the post, including in the introduction, at least one subheading, and the conclusion, without overstuffing it.
- Write for humans first, search engines second. While SEO is important, content that feels robotic or keyword-stuffed will drive readers away.
- Keep sentences and paragraphs digestible. Long blocks of text can overwhelm readers, especially on mobile devices.
- Update older posts periodically. WordPress makes it easy to edit and republish content, so revisiting older blog posts to keep information current can help maintain search rankings over time.
- Encourage engagement. Ending your post with a question or call-to-action can increase comments and shares.
Final Thoughts
Learning how to upload blog in WordPress is a foundational skill that opens the door to consistent content creation, audience engagement, and long-term SEO success. Whether you’re using the modern block editor, the classic editor, or even the mobile app, the process follows a similar logical flow: log in, create a new post, add your title and content, insert media, optimize for search engines, and publish or schedule your post.
By following the steps outlined in this guide, you’ll not only understand the technical process of uploading a blog post, but also the best practices that make your content more effective, readable, and discoverable. With consistent practice, uploading blogs in WordPress will become second nature, allowing you to focus more of your energy on creating valuable, engaging content for your audience.
Whether you’re building a personal blog, growing a business website, or managing content for clients, mastering this process is an essential step toward running a successful WordPress site.
Hurrah, that’s what I was exploring for, what a stuff!
present here at this web site, thanks admin of this web site.