
How to Migrate WordPress Site Without Losing SEO: The Complete Step-by-Step Guide
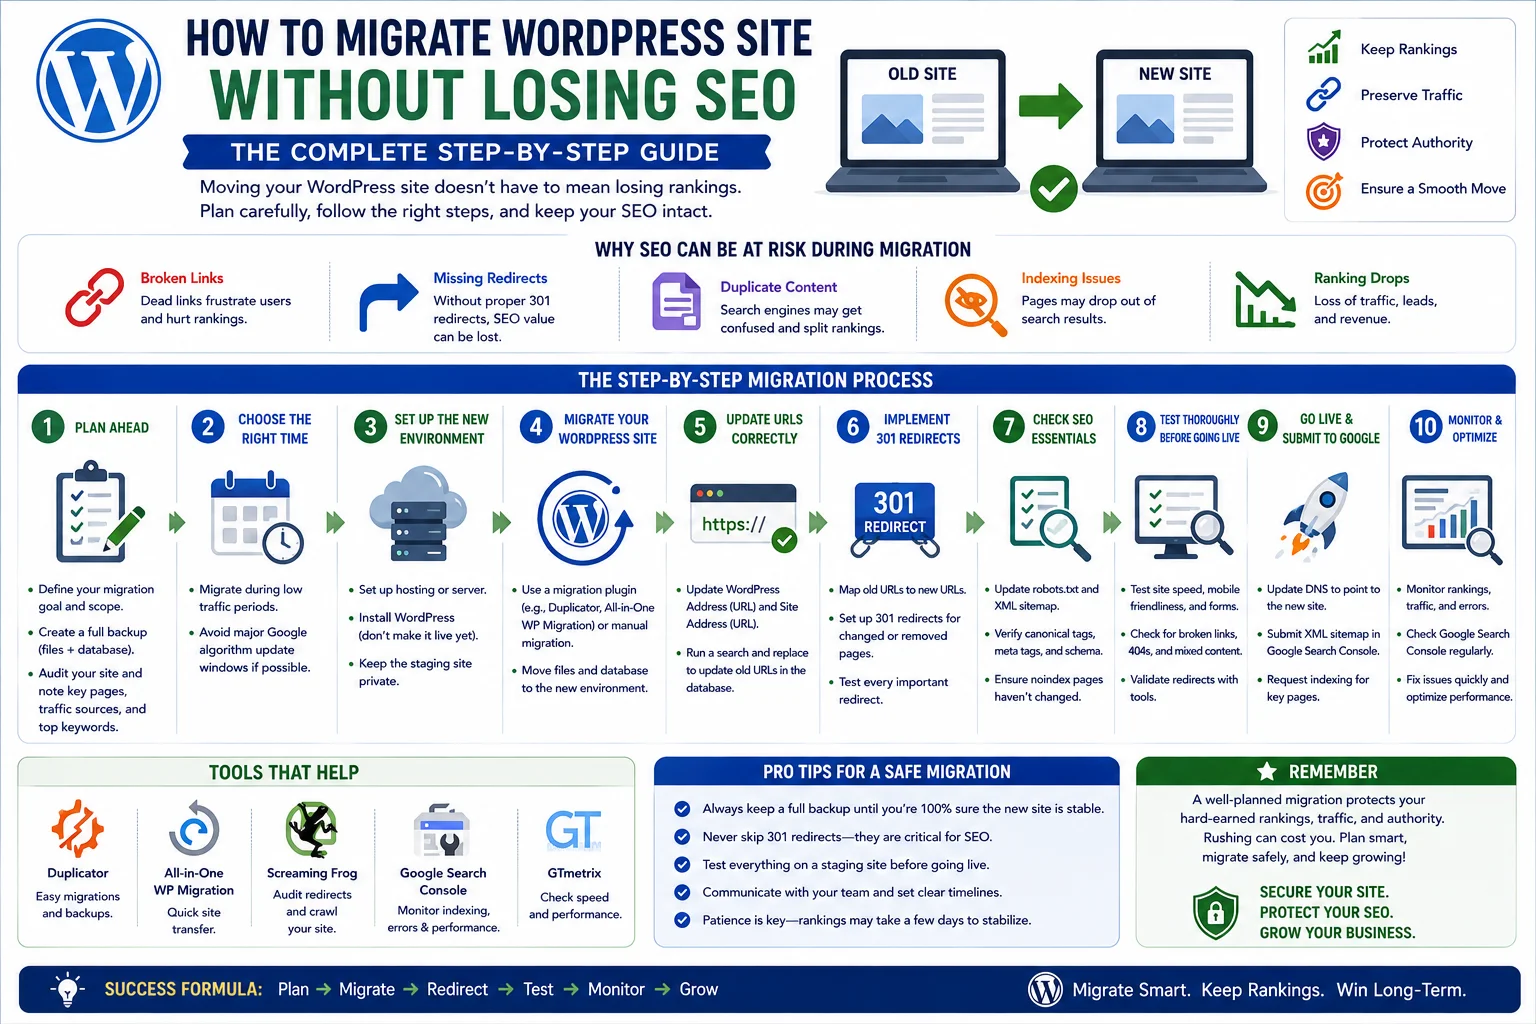
How to migrate WordPress site without losing SEO is one of the most common questions site owners ask before a big move. Moving a website is one of the most nerve-wracking tasks a site owner can undertake. Whether you’re switching hosting providers, changing domain names, moving from HTTP to HTTPS, or restructuring your entire site, the question on every marketer’s and developer’s mind is the same: how do you migrate WordPress site without losing SEO?
It’s a fair worry. Search engines like Google have spent months, sometimes years, building trust in your domain, indexing your pages, and ranking your content for valuable keywords. A poorly planned migration can undo all of that in a matter of days — broken links, lost redirects, duplicate content, and vanished rankings are common casualties of a rushed move.
The good news is that WordPress migrations don’t have to be risky. With careful planning, the right tools, and a methodical approach, you can move your site to a new host, domain, or server architecture while keeping your search visibility completely intact — and in some cases, even improve it. This guide walks you through everything you need to know about how to migrate WordPress site without losing SEO, from pre-migration planning to post-launch monitoring.
Why WordPress Site Migrations Put SEO at Risk
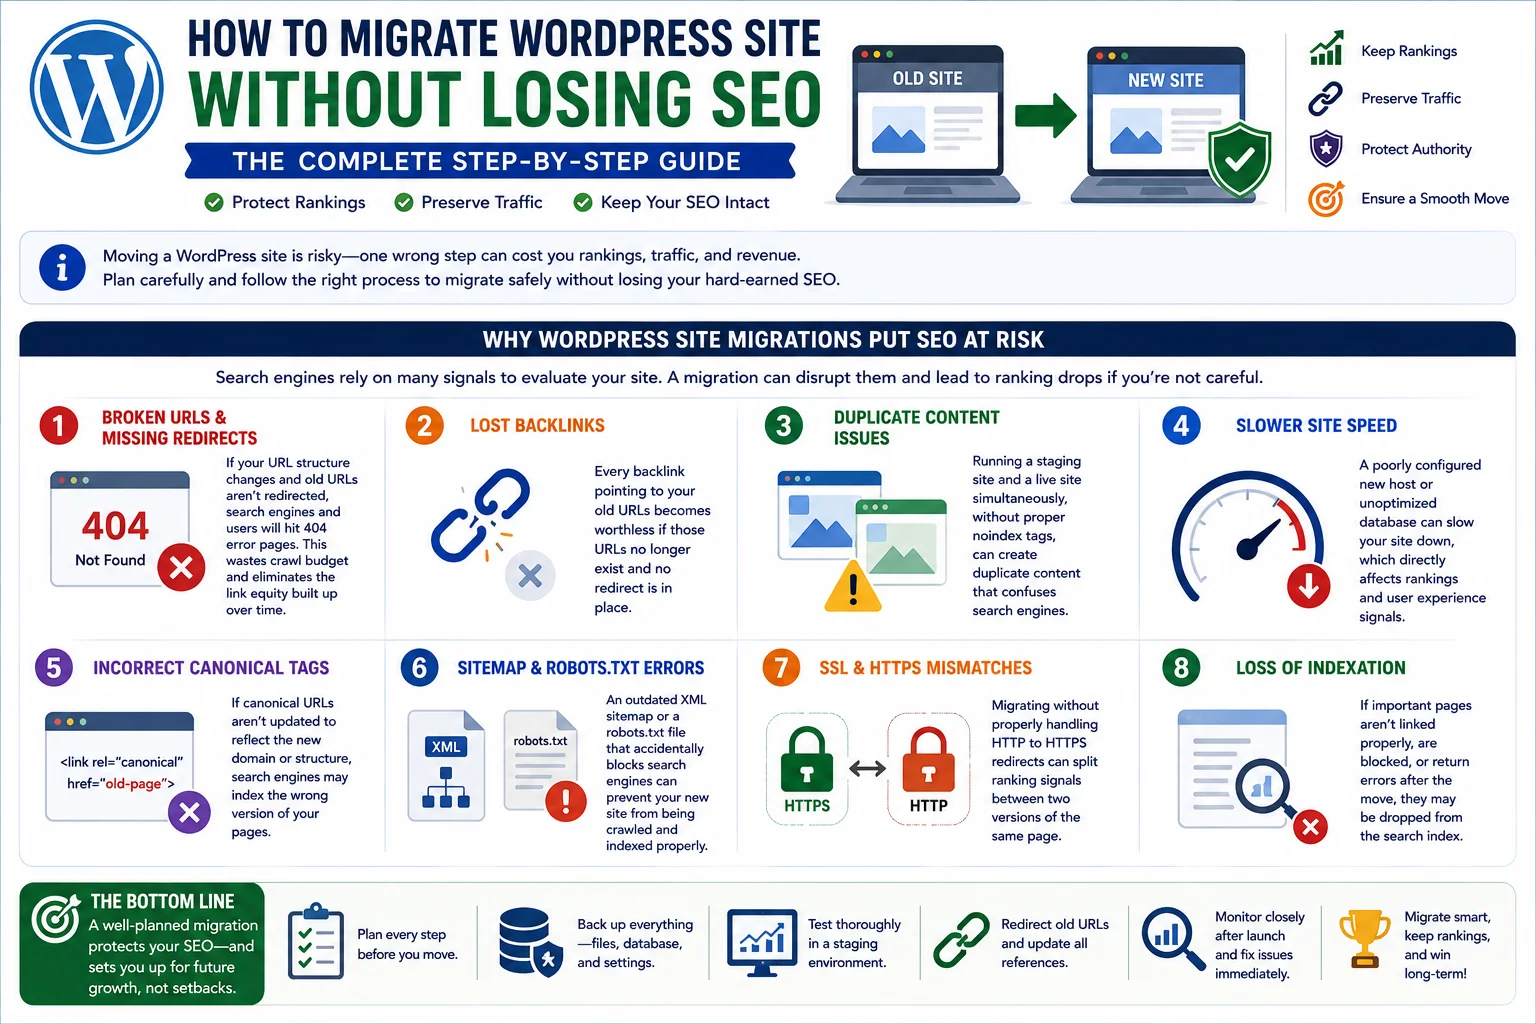
Before diving into the how-to, it’s worth understanding exactly why migrations can hurt SEO in the first place. Search engines evaluate websites based on a combination of factors: crawlability, indexation, backlinks, page speed, content relevance, and user experience. A migration touches nearly all of these factors simultaneously, which is why the risk is so high.
Here are the most common ways a WordPress migration damages SEO:
- Broken URLs and missing redirects. If your URL structure changes and old URLs aren’t redirected to their new equivalents, search engines and users alike will hit 404 error pages. This wastes crawl budget and eliminates the link equity built up over time.
- Lost backlinks. Every backlink pointing to your old URLs becomes worthless if those URLs no longer exist and no redirect is in place.
- Duplicate content issues. Running a staging site and a live site simultaneously, without proper noindex tags, can create duplicate content that confuses search engines.
- Slower site speed. A poorly configured new host or unoptimized database can slow your site down, which directly affects rankings and user experience signals.
- Incorrect canonical tags. If canonical URLs aren’t updated to reflect the new domain or structure, search engines may index the wrong version of your pages.
- Sitemap and robots.txt errors. An outdated XML sitemap or a robots.txt file that accidentally blocks search engines can prevent your new site from being crawled and indexed properly.
- SSL and HTTPS mismatches. Migrating without properly handling HTTP to HTTPS redirects can split ranking signals between two versions of the same page.
Understanding these risks is the first step toward avoiding them. Now let’s get into the practical process.
Types of WordPress Migrations
Not all migrations are the same, and the steps you take will vary slightly depending on what kind of move you’re making. Common WordPress migration scenarios include:
- Host migration — moving your WordPress site from one hosting provider to another without changing the domain or URL structure.
- Domain migration — moving your site to a brand-new domain name (e.g., rebranding from olddomain.com to newdomain.com).
- Protocol migration — switching from HTTP to HTTPS.
- Subdomain to subdirectory migration (or vice versa) — for example, moving a blog from blog.example.com to example.com/blog.
- Platform migration — moving from another CMS to WordPress, or from WordPress.com to a self-hosted WordPress.org site.
- Site restructuring — changing your URL slugs, category structure, or site architecture without changing hosts or domains at all.
Each of these carries its own SEO considerations, but the core principles — backups, redirects, sitemap updates, and monitoring — apply across the board.
How to Migrate WordPress Site Without Losing SEO: Step-by-Step Process
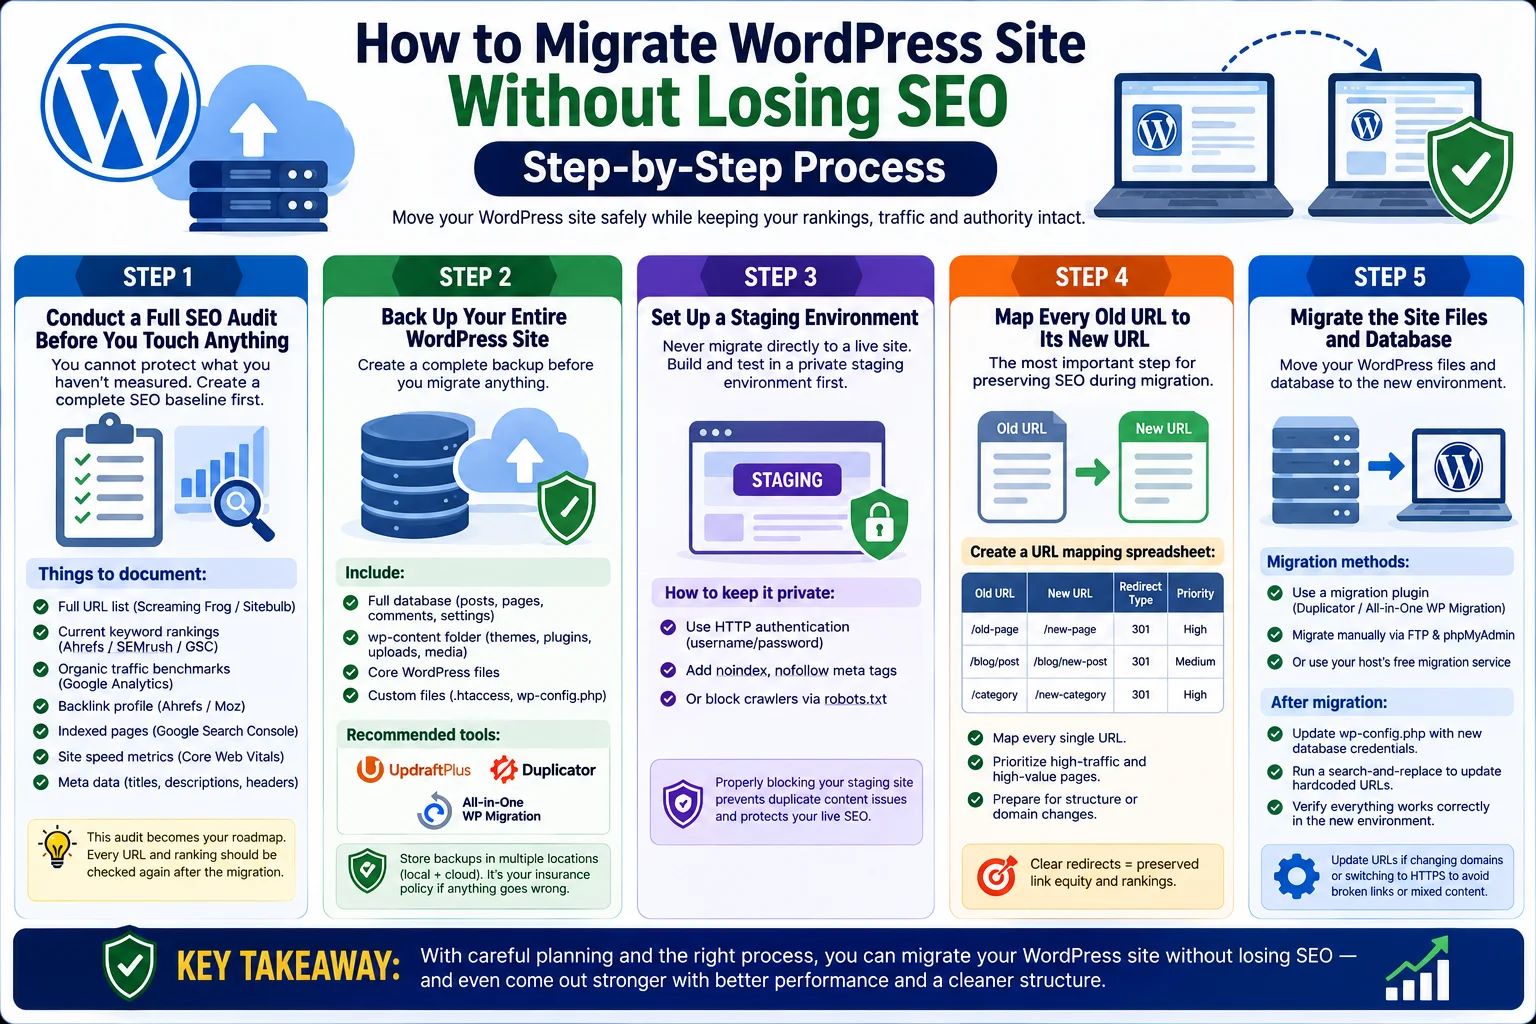
Step 1: Conduct a Full SEO Audit Before You Touch Anything
You cannot protect what you haven’t measured. Before any migration work begins, take a complete inventory of your site’s current SEO status. This baseline will let you verify, after migration, that nothing has been lost.
Things to document before migration:
- Full URL list. Use a crawler like Screaming Frog or Sitebulb to crawl your entire site and export every indexed URL.
- Current rankings. Record your keyword rankings for your most important pages using a tool like Ahrefs, SEMrush, or Google Search Console.
- Organic traffic benchmarks. Pull traffic data from Google Analytics for the past 3-6 months so you have a clear “before” picture.
- Backlink profile. Export a full list of backlinks pointing to your site from Ahrefs or Moz. You’ll need this later to make sure high-value linked pages are properly redirected.
- Indexed pages. Check Google Search Console’s Coverage report to see exactly how many pages Google has indexed.
- Site speed metrics. Record your current Core Web Vitals and PageSpeed Insights scores.
- Meta data. Export all title tags, meta descriptions, and header tags, especially for high-traffic pages.
This audit isn’t just a safety net — it becomes your roadmap. Every URL you find should end up mapped to a destination on the new site, and every important keyword ranking should be checked again once the migration is live.
Step 2: Back Up Your Entire WordPress Site
This step sounds obvious, but it’s the one most frequently rushed. Before you migrate anything, create a complete backup of your WordPress site, including:
- The full database (all posts, pages, comments, and settings)
- The
wp-contentfolder (themes, plugins, uploads, and media files) - Core WordPress files
- Any custom configuration files like
.htaccessorwp-config.php
Plugins like UpdraftPlus, Duplicator, or All-in-One WP Migration can automate this process. Store backups in more than one location — ideally both locally and in cloud storage — so you have a fallback if anything goes wrong mid-migration. A solid backup is your insurance policy; if a migration step fails or content gets corrupted, you can restore the original site instantly and try again without any lasting SEO damage.
Step 3: Set Up a Staging Environment
Never migrate directly into a live, public-facing environment. Instead, build your new site in a staging environment first — a private, password-protected version of the site that search engines cannot crawl or index.
Most modern hosting providers (WP Engine, Kinsta, SiteGround, Cloudways) offer one-click staging environments. If yours doesn’t, you can create a staging subdomain manually and restrict access using:
- HTTP authentication (username/password protection)
- A
noindex, nofollowmeta tag on all staging pages - Blocking search engine crawlers entirely via
robots.txton the staging server
This step matters enormously for SEO. If Google crawls and indexes your staging site, you risk duplicate content problems, and in some cases, Google may even index the staging URLs instead of your live ones. Always confirm the staging environment is properly blocked before uploading any content there.
Step 4: Map Every Old URL to Its New URL
This is arguably the single most important step in preserving SEO during a WordPress migration. Take the full URL list you exported during your audit and create a spreadsheet mapping every old URL to its corresponding new URL.
If your migration doesn’t change the URL structure (for example, you’re only changing hosting providers), this step is simple — old and new URLs will match exactly. But if you’re changing domains, restructuring categories, updating permalinks, or merging pages, you need a clear one-to-one mapping for every single URL.
Your spreadsheet should include:
| Old URL | New URL | Redirect Type | Priority (based on traffic/backlinks) |
|---|
Prioritize your highest-traffic and most-linked pages first. These are the pages most likely to cause noticeable ranking or traffic drops if something goes wrong.
Step 5: Migrate the Site Files and Database
With your backup complete, staging environment ready, and URL map in hand, you’re ready for the technical migration itself. There are a few common methods:
Using a migration plugin. Plugins like Duplicator, All-in-One WP Migration, or WP Migrate DB Pro can package your entire site (files and database) into a single exportable file that can be imported into the new environment. This is the most beginner-friendly approach.
Manual migration via FTP and phpMyAdmin. For more control, you can manually transfer files via FTP/SFTP and export/import your database using phpMyAdmin or the command line (mysqldump). This method requires more technical knowledge but gives you finer control over the process, which can be useful for large or complex sites.
Host-assisted migration. Many hosting companies offer free migration services or built-in migration tools, especially when you’re moving to their platform. This can be the safest option since their support teams are experienced with the process.
Regardless of the method, after migration, update the wp-config.php file with the correct database credentials for the new environment, and use a search-and-replace tool (like the one built into WP Migrate DB Pro, or the free “Better Search Replace” plugin) to update any hardcoded URLs in the database — especially important if you’re changing domains or switching to HTTPS.
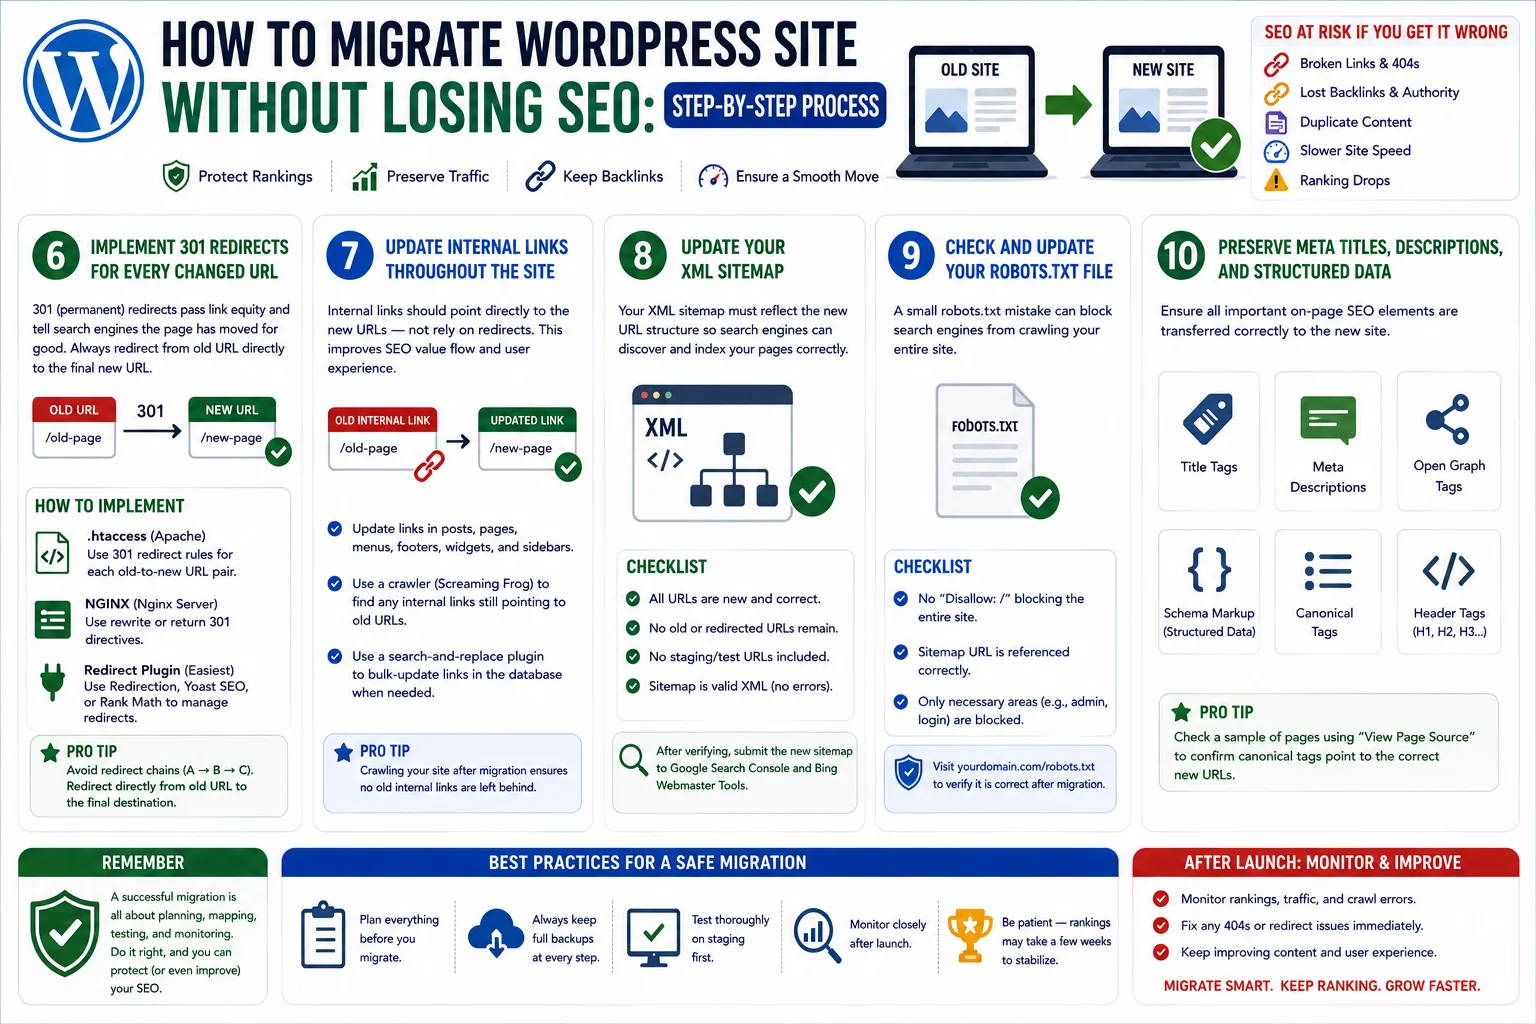
Step 6: Implement 301 Redirects for Every Changed URL
Once your new site is live on staging (and later, once it goes live publicly), it’s time to implement redirects using the URL mapping spreadsheet you created earlier.
Always use 301 (permanent) redirects, not 302 (temporary) redirects, when migrating URLs permanently. A 301 redirect tells search engines that the page has moved permanently and passes the vast majority of the page’s ranking authority (sometimes called “link equity”) to the new URL. A 302 redirect, by contrast, tells search engines the move is temporary, so they won’t transfer ranking signals in the same way — and Google may continue to index the old URL instead.
You can implement 301 redirects in a few ways on WordPress:
- Via
.htaccessfile (for Apache servers), using redirect rules for each old-to-new URL pair. - Via Nginx configuration (for Nginx servers), using
rewriteorreturn 301directives. - Using a redirect plugin like Redirection, Yoast SEO’s redirect manager, or Rank Math’s redirection module — ideal for site owners who aren’t comfortable editing server configuration files directly.
For large sites with hundreds or thousands of URLs, consider implementing pattern-based redirects (e.g., redirecting an entire old category structure to a new one) rather than manually mapping every single URL, where it makes sense to do so.
Double-check for redirect chains. A redirect chain happens when URL A redirects to URL B, which then redirects to URL C. Each hop in a chain adds load time and can dilute SEO value. Always redirect directly from the original URL to its final destination.
Step 7: Update Internal Links Throughout the Site
Redirects handle external links and bookmarked URLs, but they shouldn’t be your only line of defense. Every internal link within your own content — in blog posts, navigation menus, footers, and widgets — should be manually updated to point directly to the new URLs rather than relying on a redirect.
Why does this matter? Relying on redirects for internal links adds unnecessary load time for users and can slightly dilute the SEO value passed through internal linking. It also creates a poor user experience, particularly if a redirect chain forms over time as the site evolves further.
Use a tool like Screaming Frog to crawl your new site and identify any internal links still pointing to old URLs. A search-and-replace plugin can help you bulk-update these links across your entire content database.
Step 8: Update Your XML Sitemap
Your XML sitemap is one of the primary ways search engines discover and understand the structure of your site. After migration, your sitemap needs to reflect the new URL structure exactly.
If you use an SEO plugin like Yoast SEO or Rank Math, your sitemap will typically regenerate automatically once your permalinks and content are updated. However, you should manually verify the sitemap at yourdomain.com/sitemap.xml (or sitemap_index.xml) to confirm:
- All URLs listed reflect the new, correct structure
- No old or redirected URLs remain in the sitemap
- No staging or test URLs have accidentally been included
- The sitemap format is valid XML with no errors
Once verified, submit the updated sitemap to Google Search Console and Bing Webmaster Tools to prompt faster recrawling and reindexing of your new URLs.
Step 9: Check and Update Your Robots.txt File
Your robots.txt file tells search engines which parts of your site they’re allowed to crawl. During migration, it’s alarmingly common for a robots.txt file to accidentally block search engines from crawling the entire live site — often because a “Disallow: /” rule used on staging gets carried over to production by mistake.
After migration, visit yourdomain.com/robots.txt and confirm:
- The file does not contain a blanket disallow rule blocking the whole site
- Your sitemap URL is referenced correctly within the file
- Any legitimately restricted areas (like admin folders) are still appropriately blocked
This is a simple check that takes seconds but has saved countless site owners from an SEO disaster.
Step 10: Preserve Meta Titles, Descriptions, and Structured Data
If your migration involves exporting and reimporting content, double-check that all metadata transferred correctly. This includes:
- Title tags
- Meta descriptions
- Open Graph tags (for social sharing)
- Schema markup / structured data (review stars, FAQ schema, breadcrumbs, etc.)
- Canonical tags
Canonical tags deserve special attention. Every page should have a canonical tag pointing to itself on the new domain or URL structure. If canonical tags still reference the old domain after migration, search engines may continue crediting the old site rather than the new one, undermining the entire purpose of the migration.
Most SEO plugins handle canonical tags automatically based on your site’s current URL settings, but it’s worth spot-checking a sample of pages manually using your browser’s “View Page Source” feature to confirm the canonical URL is correct.
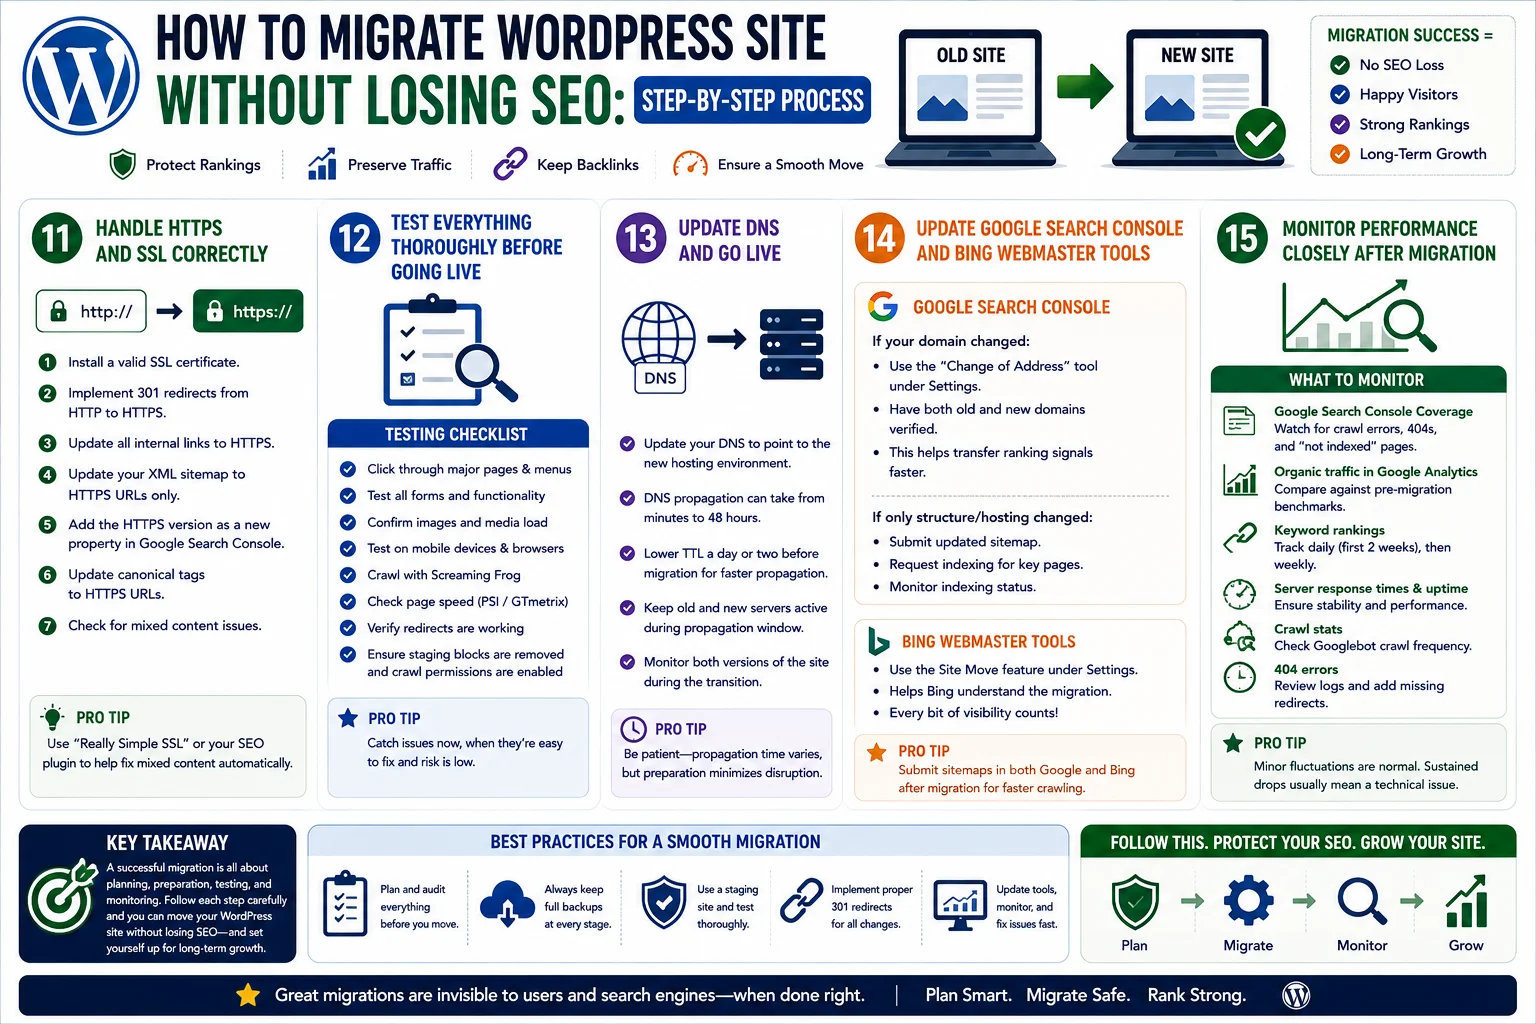
Step 11: Handle HTTPS and SSL Correctly
If your migration includes a move from HTTP to HTTPS, treat it as a full URL migration in its own right, since technically, every URL on your site is changing (from http:// to https://).
Steps to handle this properly:
- Install a valid SSL certificate on the new server before going live.
- Implement site-wide 301 redirects from every HTTP URL to its HTTPS equivalent.
- Update all internal links to use HTTPS.
- Update your XML sitemap to list HTTPS URLs only.
- Add the HTTPS version of your site as a new property in Google Search Console.
- Update canonical tags to reference HTTPS URLs.
- Check for mixed content warnings (where HTTPS pages still load some resources over HTTP, such as images or scripts), which can trigger browser security warnings and hurt user trust signals.
Step 12: Test Everything Thoroughly Before Going Live
Before pointing your domain’s DNS to the new server or making the new site publicly accessible, run a comprehensive testing pass. This is your last opportunity to catch problems while the stakes are still low.
Testing checklist:
- Click through every major page and navigation menu to confirm links work
- Test all forms (contact forms, newsletter signups, checkout flows if e-commerce)
- Confirm images and media files load correctly
- Test the site on mobile devices and multiple browsers
- Run a crawl with Screaming Frog to check for broken links, missing meta tags, or duplicate content
- Verify page load speed using Google PageSpeed Insights or GTmetrix
- Confirm all redirects are functioning as expected by spot-checking a sample of URLs from your mapping spreadsheet
- Double-check that the staging/testing environment blocks are removed before final launch, and that the correct crawl permissions are enabled
Step 13: Update DNS and Go Live
Once testing confirms everything works as expected, it’s time to point your domain to the new hosting environment by updating your DNS settings.
DNS propagation can take anywhere from a few minutes to 48 hours to fully complete across the internet, depending on your DNS provider and TTL (time-to-live) settings. During this window, some visitors may still see the old site while others see the new one. To minimize SEO disruption during this transition:
- Lower your DNS TTL setting a day or two before migration so that propagation happens faster once you make the switch
- Keep both the old and new servers active and in sync during the propagation window, if possible
- Monitor both versions of the site closely during this period
Step 14: Update Google Search Console and Bing Webmaster Tools
Once your new site is live and DNS has fully propagated, update your search engine tools accordingly.
If your domain changed: Use the Change of Address tool in Google Search Console, found under Settings. This formally tells Google that your site has permanently moved to a new domain, helping speed up the transfer of ranking signals. You’ll need to have both the old and new domain properties verified in Search Console to use this feature.
If only your hosting or URL structure changed (domain stayed the same): You don’t need the Change of Address tool, but you should still submit your updated sitemap and request indexing for key pages to help Google recrawl the new structure faster.
For Bing: Bing Webmaster Tools has a similar site-move feature under its settings, and it’s worth completing this step even though Bing typically has a smaller share of search traffic — every bit of preserved visibility counts.
Step 15: Monitor Performance Closely After Migration
The work isn’t done once the site is live. The days and weeks following a migration are critical for catching and fixing any lingering SEO issues before they cause lasting damage.
What to monitor:
- Google Search Console Coverage report. Watch for spikes in crawl errors, 404s, or pages marked as “not indexed.”
- Organic traffic in Google Analytics. Compare daily and weekly traffic against your pre-migration benchmarks. Some fluctuation is normal, but sharp, sustained drops signal a problem.
- Keyword rankings. Track your priority keywords daily for the first two weeks, then weekly for the following month, using your rank tracking tool of choice.
- Server response times and uptime. Confirm the new hosting environment is stable and performing at least as well as the old one.
- Crawl stats. Check how frequently Googlebot is crawling your new site; a sudden drop in crawl frequency can indicate a technical issue.
- 404 errors. Regularly check your 404 error logs (available in Search Console or via server logs) for missed redirects, and add new redirect rules as needed.
It’s normal to see minor, temporary fluctuations in traffic and rankings during the reindexing period, which can last anywhere from a few days to a few weeks depending on your site’s size and crawl frequency. Sustained drops beyond that window usually point to a specific technical issue that needs troubleshooting — most commonly a missed redirect, blocked resource, or canonical tag error.
Common Mistakes That Cause SEO Loss During Migration
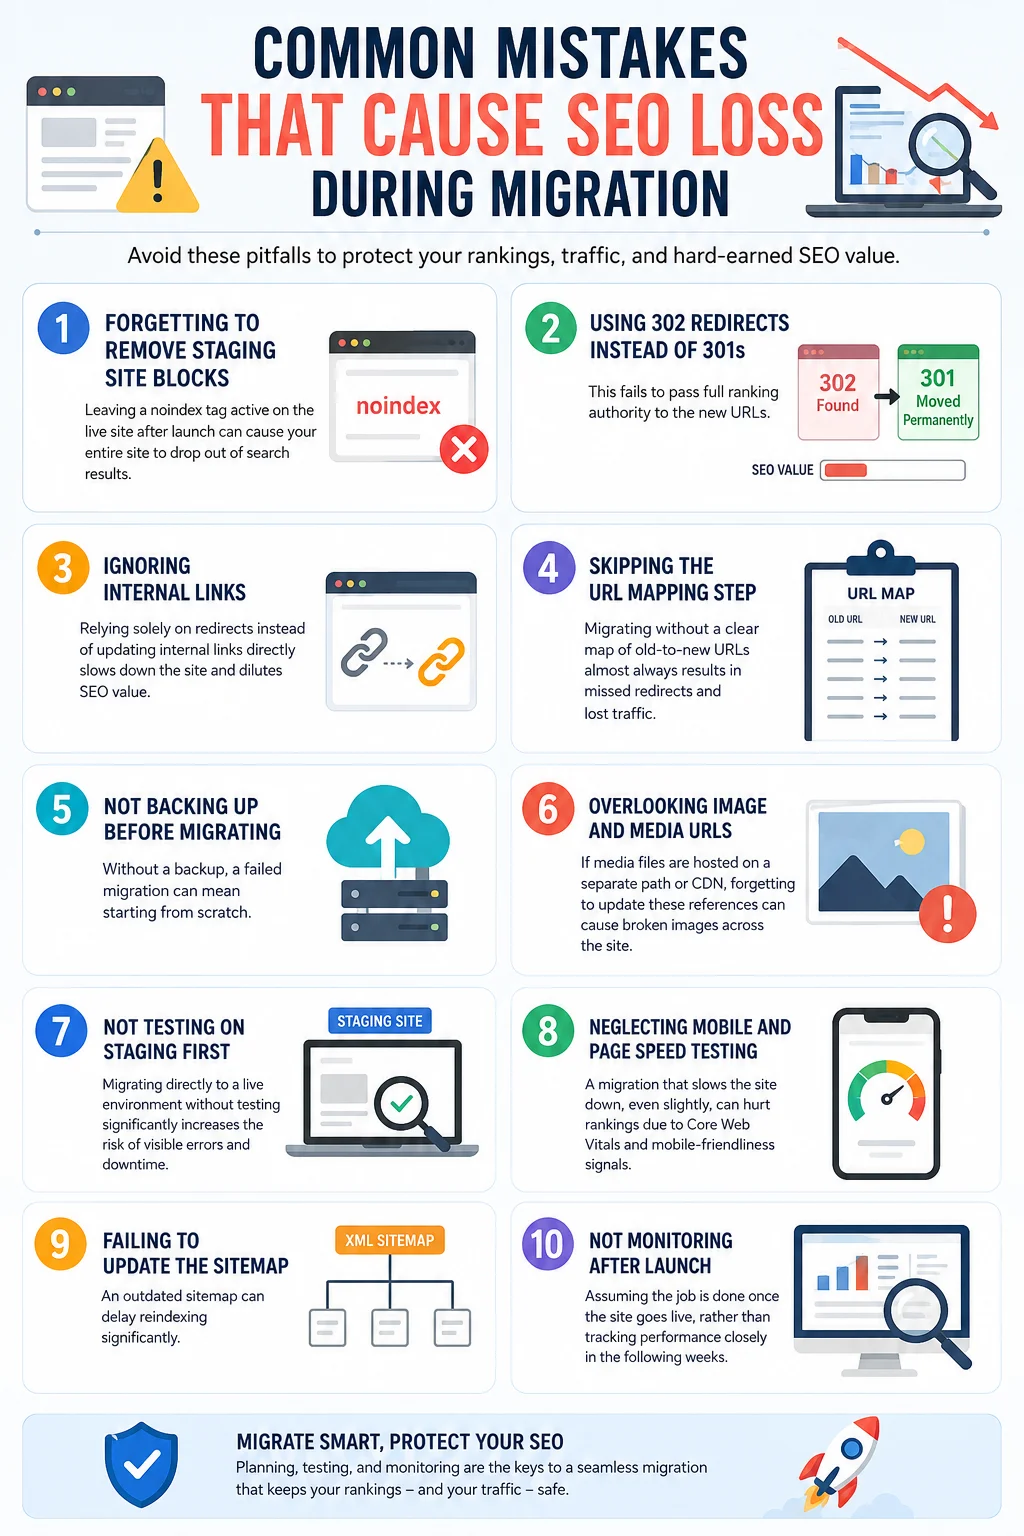
Even experienced site owners make mistakes during migration. Being aware of these common pitfalls can help you avoid them entirely.
- Forgetting to remove staging site blocks. Leaving a
noindextag active on the live site after launch is one of the most common — and most damaging — migration errors, as it can cause your entire site to drop out of search results. - Using 302 redirects instead of 301s. This fails to pass full ranking authority to the new URLs.
- Ignoring internal links. Relying solely on redirects instead of updating internal links directly slows down the site and dilutes SEO value.
- Skipping the URL mapping step. Migrating without a clear map of old-to-new URLs almost always results in missed redirects and lost traffic.
- Not backing up before migrating. Without a backup, a failed migration can mean starting from scratch.
- Overlooking image and media URLs. If media files are hosted on a separate path or CDN, forgetting to update these references can cause broken images across the site.
- Not testing on staging first. Migrating directly to a live environment without testing significantly increases the risk of visible errors and downtime.
- Neglecting mobile and page speed testing. A migration that slows the site down, even slightly, can hurt rankings due to Core Web Vitals and mobile-friendliness signals.
- Failing to update the sitemap. An outdated sitemap can delay reindexing significantly.
- Not monitoring after launch. Assuming the job is done once the site goes live, rather than tracking performance closely in the following weeks.
Tools That Make WordPress Migration Safer
A variety of tools can streamline the migration process and reduce the chance of SEO-damaging errors:
- Screaming Frog SEO Spider — for crawling your old and new site to compare URLs, meta data, and internal links
- Duplicator or All-in-One WP Migration — for packaging and transferring your WordPress site
- UpdraftPlus — for comprehensive backups
- Redirection plugin — for managing 301 redirects directly within WordPress
- Better Search Replace — for updating hardcoded URLs in the database
- Google Search Console — for monitoring indexing, crawl errors, and using the Change of Address tool
- Google Analytics — for tracking traffic trends before and after migration
- Ahrefs, SEMrush, or Moz — for tracking keyword rankings and backlink profiles
- GTmetrix or PageSpeed Insights — for verifying site speed hasn’t regressed
A Sample WordPress Migration Timeline
Because so many moving parts are involved, it helps to think of your migration as a project spread across several weeks rather than something done in a single afternoon. Below is a realistic timeline you can adapt to your own site’s size and complexity.
Two to three weeks before migration: Complete your full SEO audit, export your URL list, record baseline rankings and traffic, and back up your current site. This is also the point to choose your new host or domain and begin building out the staging environment.
One to two weeks before migration: Build and test the new site on staging. Create your full URL mapping spreadsheet, draft your redirect rules, and update internal links within the staging environment. Run a Screaming Frog crawl of both the old site and the staging site to compare structures side by side.
Two to three days before migration: Lower your DNS TTL settings to speed up propagation later. Do a final round of testing on staging, including forms, checkout flows, mobile responsiveness, and page speed. Confirm your backup is current and accessible.
Migration day: Choose a low-traffic window if possible. Take a final backup immediately before migrating. Push the new site live, implement your 301 redirects, update DNS, and verify the robots.txt and sitemap are correct. Submit the updated sitemap to Google Search Console and Bing Webmaster Tools, and if applicable, run the Change of Address tool.
First 48 hours after migration: Monitor DNS propagation, check server response times, and spot-check a sample of redirects from your mapping spreadsheet. Watch Google Search Console for any sudden spike in crawl errors.
First two weeks after migration: Track keyword rankings daily, watch organic traffic trends in Google Analytics, and review the Coverage report in Search Console regularly for indexing issues. Fix any broken redirects or 404 errors as soon as they appear.
First month after migration: Continue monitoring rankings weekly. By this point, most well-executed migrations should show rankings and traffic stabilizing close to, or even above, pre-migration levels. If you notice sustained drops beyond typical reindexing fluctuation, revisit your redirect map, canonical tags, and sitemap for missed issues.
Having this kind of structured timeline in place, rather than treating migration as a single rushed event, is one of the most effective ways to migrate a WordPress site without losing SEO. It gives you multiple checkpoints to catch problems early, when they’re still easy to fix, rather than discovering them weeks later after damage has already been done.
Special Considerations for E-Commerce and Large Sites
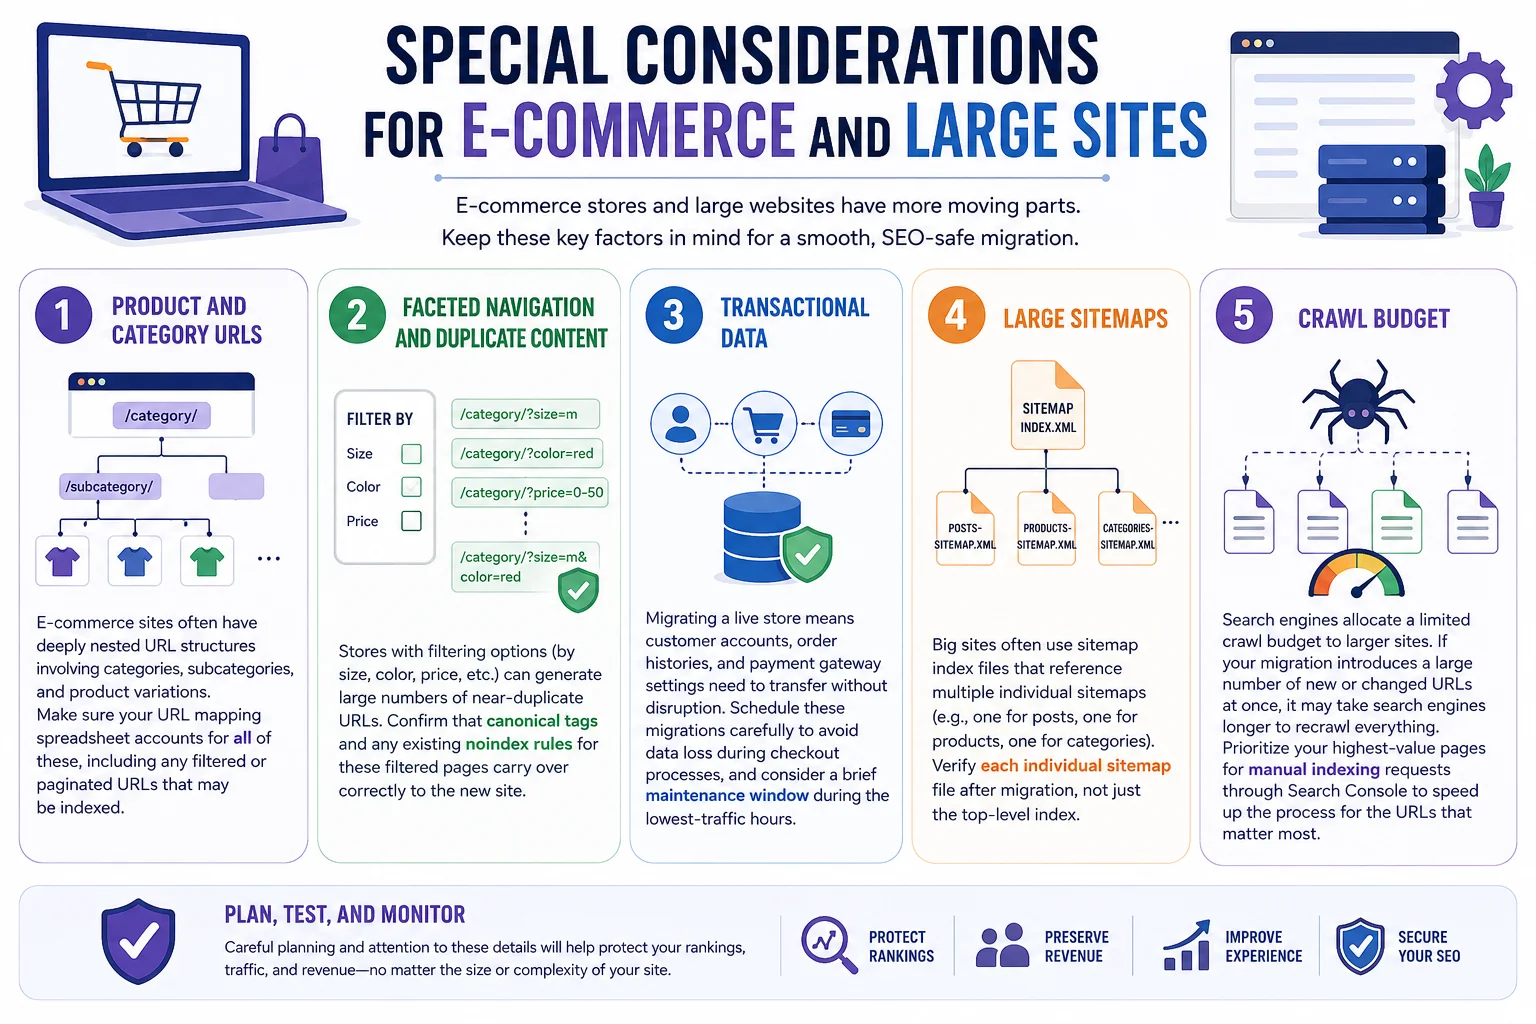
If you’re running a WooCommerce store or a large content site with thousands of pages, a few additional precautions are worth keeping in mind.
Product and category URLs. E-commerce sites often have deeply nested URL structures involving categories, subcategories, and product variations. Make sure your URL mapping spreadsheet accounts for all of these, including any filtered or paginated URLs that may be indexed.
Faceted navigation and duplicate content. Stores with filtering options (by size, color, price, etc.) can generate large numbers of near-duplicate URLs. Confirm that canonical tags and any existing noindex rules for these filtered pages carry over correctly to the new site.
Transactional data. Migrating a live store means customer accounts, order histories, and payment gateway settings need to transfer without disruption. Schedule these migrations carefully to avoid data loss during checkout processes, and consider a brief maintenance window during the lowest-traffic hours.
Large sitemaps. Big sites often use sitemap index files that reference multiple individual sitemaps (e.g., one for posts, one for products, one for categories). Verify each individual sitemap file after migration, not just the top-level index.
Crawl budget. Search engines allocate a limited crawl budget to larger sites. If your migration introduces a large number of new or changed URLs at once, it may take search engines longer to recrawl everything. Prioritize your highest-value pages for manual indexing requests through Search Console to speed up the process for the URLs that matter most.
Frequently Asked Questions
How long does it take to recover SEO rankings after a WordPress migration? In most cases, if the migration is executed correctly with proper 301 redirects and sitemap updates, rankings stabilize within a few days to a few weeks. Larger, more complex sites, or those involving a full domain change, may take longer for search engines to fully process the transition.
Will I lose all my rankings if I migrate to a new domain? Not if you do it correctly. Using 301 redirects and the Google Search Console Change of Address tool allows most of your ranking authority to transfer to the new domain, though some temporary fluctuation during the transition period is normal.
Do I need to redirect every single URL, or just the important ones? Ideally, every indexed URL should have a corresponding redirect. Skipping “less important” pages can still result in lost link equity and a poor user experience for anyone who bookmarked or linked to those pages.
Can I migrate a WordPress site without any SEO loss at all? While some minor, temporary fluctuation is common even in well-executed migrations, following the steps outlined in this guide — proper redirects, sitemap updates, internal link fixes, and close monitoring — will minimize the risk substantially and typically results in no meaningful long-term loss.
Should I migrate during a low-traffic period? Yes, whenever possible. Migrating during a period of lower site traffic (such as overnight or on a weekend, depending on your audience) reduces the number of users who might encounter temporary issues during the transition.
Final Thoughts
Now that you know how to migrate WordPress site without losing SEO, the process doesn’t have to mean sacrificing the progress you’ve worked hard to build. The key to a successful migration lies in preparation: auditing your current site thoroughly, backing everything up, mapping every URL, implementing proper 301 redirects, updating your sitemap and internal links, and closely monitoring performance after launch.
Treat your migration as a project with clear, sequential steps rather than a single event, and resist the temptation to rush. A well-planned WordPress migration, executed with attention to SEO detail at every stage, can move your site to a new home without losing the rankings, traffic, and authority you’ve earned — and set you up for continued growth on your new platform.